นี่เป็นส่วนของ
ToolTip น่ะเว้ย ลองไปอ่านดู ส่วนของ mouse
position ไม่น่าจะยากน่ะ ถ้าจะเอาก็ Post
มาบอกหละกันน่ะเว้ยUsing
ToolTip Controls
This section contains examples that demonstrate how
to create different types of ToolTips.
ToolTips for
Rectangular Areas
Tracking ToolTips
Multiline ToolTips
Balloon ToolTips
In-Place ToolTips
ToolTips for Rectangular
Areas
The following example demonstrates how to create a standard
ToolTip control and add a tool to it. The example creates a
rectangular area, which consists of a window's entire client area,
and then uses the TTM_ADDTOOL message to add a ToolTip control to
the rectangular area. The TTF_SUBCLASS flag is set in the uFlags
member of the TOOLINFO structure to have mouse messages
automatically passed to the ToolTip control.
/* CREATE A
TOOLTIP CONTROL OVER THE ENTIRE WINDOW AREA */
void CreateMyTooltip (HWND hwnd)
{
// struct specifying control classes to register
INITCOMMONCONTROLSEX iccex;
HWND hwndTT; // handle to the ToolTip control
// struct specifying info about tool in ToolTip control
TOOLINFO ti;
unsigned int uid = 0; // for ti initialization
char strTT[30] = "This is your ToolTip string.";
LPTSTR lptstr = strTT;
RECT rect; // for client area coordinates
/* INITIALIZE COMMON CONTROLS */
iccex.dwICC = ICC_WIN95_CLASSES;
iccex.dwSize = sizeof(INITCOMMONCONTROLSEX);
InitCommonControlsEx(&iccex);
/* CREATE A TOOLTIP WINDOW */
hwndTT = CreateWindowEx(WS_EX_TOPMOST,
TOOLTIPS_CLASS,
NULL,
WS_POPUP | TTS_NOPREFIX | TTS_ALWAYSTIP,
CW_USEDEFAULT,
CW_USEDEFAULT,
CW_USEDEFAULT,
CW_USEDEFAULT,
hwnd,
NULL,
ghThisInstance,
NULL
);
SetWindowPos(hwndTT,
HWND_TOPMOST,
0,
0,
0,
0,
SWP_NOMOVE | SWP_NOSIZE | SWP_NOACTIVATE);
/* GET COORDINATES OF THE MAIN CLIENT AREA */
GetClientRect (hwnd, &rect);
/* INITIALIZE MEMBERS OF THE TOOLINFO STRUCTURE */
ti.cbSize = sizeof(TOOLINFO);
ti.uFlags = TTF_SUBCLASS;
ti.hwnd = hwnd;
ti.hinst = ghThisInstance;
ti.uId = uid;
ti.lpszText = lptstr;
// ToolTip control will cover the whole window
ti.rect.left = rect.left;
ti.rect.top = rect.top;
ti.rect.right = rect.right;
ti.rect.bottom = rect.bottom;
/* SEND AN ADDTOOL MESSAGE TO THE TOOLTIP CONTROL WINDOW */
SendMessage(hwndTT, TTM_ADDTOOL, 0, (LPARAM) (LPTOOLINFO) &ti);
}
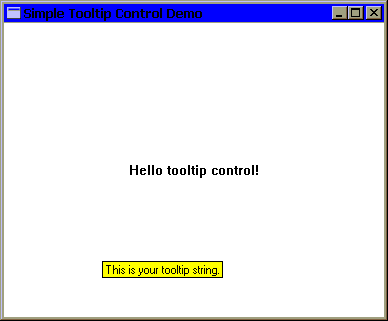
The output window for this sample looks like
this.

Tracking ToolTips
Tracking ToolTips change
position on the screen dynamically. They are supported by version
4.70 and later of the common controls. To create a tracking ToolTip,
use the TTM_ADDTOOL message, including the TTF_TRACK flag in the
uFlags member of the accompanying TOOLINFO structure.
Your application must manually activate and deactivate a tracking
ToolTip by sending a TTM_TRACKACTIVATE message. Activation or
deactivation also shows or hides the ToolTip, respectively. While a
tracking ToolTip is active, your application must specify the
location of the ToolTip by sending TTM_TRACKPOSITION messages to the
ToolTip control. Because the application handles tasks such as
positioning the ToolTip, tracking ToolTips do not use the
TTF_SUBCLASS flag or the TTM_RELAYEVENT message.
The TTM_TRACKPOSITION message causes the ToolTip control to display
the window using one of two placement styles:
By default, the ToolTip is displayed next to the corresponding tool
in a position the control chooses. The location chosen is relative
to the coordinates you provide using this message. In this case, the
ToolTip window appears to move beside the corresponding tool.
If you include the TTF_ABSOLUTE value in the uFlags member of the
TOOLINFO structure, the ToolTip will be displayed at the pixel
location specified in the message. In this case, the control does
not attempt to change the ToolTip window's location from the
coordinates you provide.
Example
The following example demonstrates how to create a ToolTip control
and assign a tool to it. The example specifies the main window's
entire client area as the tool, but you could specify distinct
portions of the client area or specify a different window
altogether.
The example uses the TTM_ADDTOOL message to add the tool to the
ToolTip control. The uFlags member of the TOOLINFO structure used in
the example includes the TTF_ABSOLUTE flag. This flag causes the
ToolTip control to display ToolTip text at the exact coordinates the
application provides when it sends the TTM_TRACKPOSITION message.
Without the TTF_ABSOLUTE flag, the ToolTip control chooses a
location to display the ToolTip text based on the coordinates you
provide. This causes ToolTip text to appear next to the
corresponding tool, but not necessarily at the exact coordinates the
application provided.
For additional information about using the TTM_TRACKPOSITION message,
see Supporting Tracking ToolTips.
HWND WINAPI CreateTT(HWND hwndOwner)
{
INITCOMMONCONTROLSEX icex;
HWND hwndTT;
TOOLINFO ti;
// Load the ToolTip class from the DLL.
icex.dwSize = sizeof(icex);
icex.dwICC = ICC_BAR_CLASSES;
if(!InitCommonControlsEx(&icex))
return NULL;
// Create the ToolTip control.
hwndTT = CreateWindow(TOOLTIPS_CLASS, TEXT(""),
WS_POPUP,
CW_USEDEFAULT, CW_USEDEFAULT,
CW_USEDEFAULT, CW_USEDEFAULT,
NULL, (HMENU)NULL, g_hinst,
NULL);
// Prepare TOOLINFO structure for use as tracking ToolTip.
ti.cbSize = sizeof(TOOLINFO);
ti.uFlags = TTF_IDISHWND | TTF_TRACK | TTF_ABSOLUTE;
ti.hwnd = hwndOwner;
ti.uId = (UINT)g_hwndMain;
ti.hinst = g_hinst;
ti.lpszText = LPSTR_TEXTCALLBACK;
ti.rect.left = ti.rect.top = ti.rect.bottom = ti.rect.right = 0;
// Add the tool to the control, displaying an error if needed.
if(!SendMessage(hwndTT,TTM_ADDTOOL,0,(LPARAM)&ti)){
MessageBox(hwndOwner,"Couldn't create the ToolTip control.",
"Error",MB_OK);
return NULL;
}
// Activate (display) the tracking ToolTip. Then, set a global
// flag value to indicate that the ToolTip is active, so other
// functions can check to see if it's visible.
SendMessage(hwndTT,TTM_TRACKACTIVATE,(WPARAM)TRUE,(LPARAM)&ti);
g_bIsVisible = TRUE;
return(hwndTT);
}
Supporting Tracking
ToolTips
The following example is a simple window process function that
supports tracking ToolTips. It requests the current position of the
mouse pointer by using the GetCursorPos function and then adds 15
pixels to the x- and y-coordinates, so the ToolTip appears slightly
below and to the right of the pointer.
Note that the example relies on the value of a global variable,
g_bIsVisible, to determine whether the application should send the
TTM_TRACKPOSITION message. For the purpose of this example,
g_bIsVisible is a Boolean variable that another function sets to
TRUE upon sending the TTM_TRACKACTIVATE message to activate the
ToolTip. This way, if the ToolTip is inactive, the additional
overhead to calculate and send a message is not incurred.
LRESULT CALLBACK WndProc (HWND hwnd, UINT msg,
WPARAM wParam, LPARAM lParam)
{
switch(msg){
case WM_MOUSEMOVE:
if(g_bIsVisible){
#define X_OFFSET 15
#define Y_OFFSET X_OFFSET
SendMessage(g_hwndTT,
TTM_TRACKPOSITION,
0,
(LPARAM)MAKELPARAM(GET_X_LPARAM(lParam) + X_OFFSET,
GET_Y_LPARAM(lParam) + Y_OFFSET));
}
break;
/*
*
* Other standard window messages can be handled here.
*
*/
}
return 0;
}
Multiline ToolTips
Multiline ToolTips allow text to be displayed on more than one line.
They are supported by version 4.70 and later of the common controls.
Your application creates a multiline ToolTip by responding to a
TTN_GETDISPINFO notification message. To force the ToolTip control
to use multiple lines, send a TTM_SETMAXTIPWIDTH message, specifying
the width of the display rectangle. Text that exceeds this width
will wrap to the next line rather than widening the display region.
The rectangle height will be increased as needed to accommodate the
additional lines. The ToolTip control will wrap the lines
automatically, or you can use a carriage return/line feed
combination, \r\n, to force line breaks at particular locations.
Note that the text buffer specified by the szText member of the
NMTTDISPINFO structure can accommodate only 80 characters. If you
need to use a longer string, point the lpszText member of
NMTTDISPINFO to a buffer containing the desired text.
The following code fragment is an example of a simple
TTN_GETDISPINFO notification handler. It creates a multiline ToolTip
by setting the display rectangle to 300 pixels and setting the
lpszText member of NMTTDISPINFO to point to a buffer with the
desired text.
char szLongMessage[ ] =
"This is a long message for the ToolTip, which will automatically "
"be wrapped when it exceeds the maximum tip width. "
"Alternatively, you can use a \r\n"
"carriage return/line feed combination\r\n"
"to force line breaks at specific\r\n"
"locations.";
switch (lpnmhdr->code) {
case TTN_GETDISPINFO:
lpttd = (LPNMTTDISPINFO)lpnmhdr;
SendMessage(lpnmhdr->hwndFrom, TTM_SETMAXTIPWIDTH, 0, 300);
lpttd->lpszText = szLongMessage;
return 0;
...
//Other notification handlers go here, as needed.
}
Balloon ToolTips
Balloon ToolTips are similar to standard ToolTips, but are displayed
in a cartoon-style "balloon" with a stem pointing to the tool.
Balloon ToolTips can be either single-line or multiline. They are
created and handled in much the same way as standard ToolTips.
The default position of the stem and rectangle is shown below. If
the tool is too close to the top of the screen, the ToolTip appears
below and to the right of the tool's rectangle. If the tool is too
close to the right side of the screen, similar principles apply, but
the ToolTip appears to the left of the tool's rectangle.

You can change the default positioning by setting the TTF_CENTERTIP
flag in the uFlags member of the ToolTip's TOOLINFO structure. In
that case, the stem normally will point to the center of the lower
edge of the tool's rectangle, and the text rectangle will be
displayed directly below the tool. The stem will attach to the text
rectangle at the center of the upper edge. If the tool is too close
to the bottom of the screen, the text rectangle will be centered
above the tool, and the stem will attach to the center of the lower
edge.
If you want to specify where the stem points, set the TTF_TRACK flag
in the uFlags member of the ToolTip's TOOLINFO structure. You then
specify the coordinate by sending a TTM_TRACKPOSITION message, with
the x- and y-coordinates in the lParam value. If TTF_CENTERTIP is
also set, the stem still points to the position specified by the
TTM_TRACKPOSITION message.
The following code fragment illustrates how to implement a centered
balloon ToolTip.
hwndToolTips = CreateWindow(TOOLTIPS_CLASS,
NULL,
WS_POPUP | TTS_NOPREFIX | TTS_BALLOON,
0, 0,
0, 0,
NULL, NULL,
g_hinst,
NULL);
if (hwndTooltip)
{
// Do the standard ToolTip coding.
TOOLINFO ti;
ti.cbSize = sizeof(ti);
ti.uFlags = TTF_TRANSPARENT | TTF_CENTERTIP;
ti.hwnd = hwnd;
ti.uId = 0;
ti.hinst = NULL;
ti.lpszText = LPSTR_TEXTCALLBACK;
GetClientRect(hwnd, &ti.rect);
SendMessage(hwndToolTips, TTM_ADDTOOL, 0, (LPARAM) &ti );
}
Balloon ToolTips
for Status Bar Icons
A nonintrusive way to display an explanatory message for a status
bar icon is to implement a balloon ToolTip with its stem pointing to
the icon. The ToolTip will disappear when clicked, but you can also
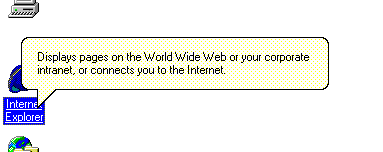
specify a time-out value. The ToolTip will look similar to the
following illustration.

For a detailed discussion of the status bar, see the Taskbar
documentation.
The following code fragment illustrates how to add a balloon ToolTip
to a status bar icon.
To display a balloon ToolTip, you need to set the NIF_INFO flag in
the NOTIFYICONDATA structure, and use the szInfo and uTimeout
members to specify the ToolTip text and time-out duration.
#define ARRAYSIZE(a) (sizeof(a)/sizeof(a[0]))
NOTIFYICONDATA IconData = {0};
IconData.cbSize = SIZEOF(IconData);
IconData.hWnd = hwndNI;
IconData.uFlags = NIF_INFO;
lstrcpyn(IconData.szInfo, TEXT("Your message text goes here."),
ARRAYSIZE(IconData.szInfo));
IconData.uTimeout = 15000; // in milliseconds
Shell_NotifyIcon(NIM_MODIFY, &IconData);
In-Place ToolTips
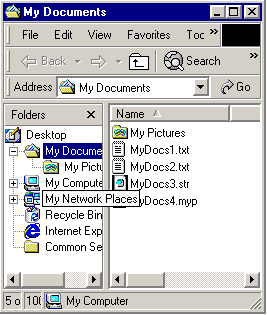
In-place ToolTips are used to display text strings for objects that
have been clipped, such as the folder names shown below in Microsoft?
Windows? Explorer. In this illustration, My Network Places is
displayed in an in-place ToolTip.

The difference between ordinary and in-place ToolTips is
positioning. By default, when the mouse pointer hovers over a region
that has a ToolTip associated with it, the ToolTip is displayed
adjacent to the region. However, ToolTips are windows, and they can
be positioned anywhere you choose by calling SetWindowPos. Creating
an in-place ToolTip is a matter of positioning the ToolTip window so
that it overlays the text string.
Positioning an In-Place ToolTip
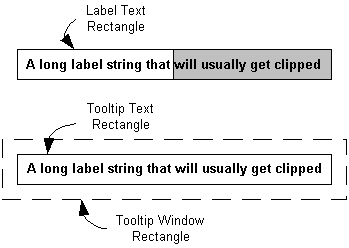
You need to keep track of three rectangles when positioning an in-place
ToolTip:
The rectangle that surrounds the complete label text.
The rectangle that surrounds the ToolTip text. The ToolTip text is
identical to the complete label text, and normally is the same size
and font. The two text rectangles will thus usually be the same
size.
The ToolTip's window rectangle. This rectangle is somewhat larger
than the ToolTip text rectangle that it encloses.
The three rectangles are shown schematically in the following
illustration. The hidden portion of the label text is indicated by a
gray background.

To create an in-place ToolTip, you must position the ToolTip text
rectangle so that it overlays the label text rectangle. The
procedure for aligning the two rectangles is relatively
straightforward:
Define the label text rectangle.
Position the ToolTip window so that the ToolTip text rectangle
overlays the label text rectangle
In practice, it is usually sufficient to align the upper-left corner
of the two text rectangles. Attempting to resize the ToolTip text
rectangle to exactly match the label text rectangle could cause
problems with the ToolTip display.
The problem with this simple scheme is that you can't position the
ToolTip text rectangle directly. Instead, you must position the
ToolTip window rectangle just far enough above and to the left of
the label text rectangle so that the corners of the two text
rectangles coincide. In other words, you need to know the offset
between the ToolTip window rectangle and its enclosed text
rectangle. In general, there is no simple way to determine this
offset.
Using TTM_ADJUSTRECT to Position a ToolTip
Common controls version 5.80 simplifies the use of in-place ToolTips
by the addition of a new message, TTM_ADJUSTRECT. Send this message
with the coordinates of the label text rectangle that you want the
ToolTip to overlay, and it will return the coordinates of an
appropriately positioned ToolTip window rectangle.
The following code fragment illustrates how to use TTM_ADJUSTRECT in
a TTN_SHOW handler to display an in-place ToolTip. Your application
indicates that the label text is truncated by setting the private
fMyStringIsTruncated variable to TRUE. The handler calls an
application-defined function, GetMyItemRect, to retrieve the label
text rectangle. This rectangle is passed to the ToolTip control with
TTM_ADJUSTRECT, which returns the corresponding window rectangle.
SetWindowPosition is then called to position the ToolTip over the
label.
case TTN_SHOW:
if (fMyStringIsTruncated) {
RECT rc;
GetMyItemRect(&rc);
SendMessage(hwndToolTip, TTM_ADJUSTRECT, TRUE, (LPARAM)&rc);
SetWindowPos(hwndToolTip,
NULL,
rc.left, rc.top,
0, 0,
SWP_NOSIZE|SWP_NOZORDER|SWP_NOACTIVATE);
}
This example does not change the size of the ToolTip, just its
position. The two text rectangles will be aligned at their upper-left
corners, but not necessarily with the same dimensions. In practice,
the difference is usually small, and this approach is recommended
for most purposes. While you can, in principle, use SetWindowPos to
resize as well as reposition the ToolTip, doing so might have
unpredictable consequences.
|